Package a Python Application with MSIX
This article demonstrates how to use MSIX to package a Windows desktop application written in Python and techniques to distribute it. MSIX is a packaging format from Microsoft that offers native installation and application updates, distributed via the Microsoft Store or from an external source. There are other key benefits, such as avoiding Windows SmartScreen prompts and options for code-signing. For an in-depth outline of these features and more, see the MISX resources.
Building an Executable
To make it simple for users to run your application, you will need a tool that bundles your Python code into an executable containing the Python interpreter, package dependencies, and runtime dependencies. I will demonstrate this using PyInstaller, a popular tool for this purpose.
Demonstration
The example below uses PyInstaller to bundle a simple Python application with an executable entry point. Assuming you already have Python installed, launch PowerShell, and from an empty directory perform the following:
PS> py.exe -3 -m venv .venv
PS> ./.venv/Scripts/Activate.ps1
(venv) PS> pip install pyinstaller
...
(venv) PS> "input('Hello World!')" | Out-File demo.py -Encoding utf8
(venv) PS> python demo.py
Hello World!
(venv) PS> pyinstaller demo.py --clean
...
(venv) PS> .\dist\demo\demo.exe
Hello World!
Pretty simple, right? You could zip the demo folder and distribute it right
now! Alternatively, running pyinstaller with the --onefile option will
bundle all the dependencies into a single executable, making it even easier to
distribute. But it is not that simple, as I will explain in the next section.
If your Anti-Virus software flags a file in the pip installation of PyInstaller or the executable it creates as malware, it is a false positive. See PyInstaller AV False-Positive Issues on GitHub for more information.
PyInstaller one-file executables work by extracting all the application files stored in the executable to the Windows Temp directory and then running the app from there. This process increases the time it takes to launch the application and is unnecessary for MSIX packaging since the user is presented with a single file to download and install.
Anti-Virus False Positives
As PyInstaller became a popular tool for legitimate developers to build
executables, it unfortunately also did for malware devs. As malicious software
became more elusive, AV vendors harnessed broader techniques, such as AI, to
continue identifying them. Unfortunately, since most of the underlying
components between malware and legitimate applications are similar in
composition (ex. the Python interpreter, runtime dependencies, etc.), AV
engines may flag genuine apps bundled by PyInstaller as malware.
Here is a submission of demo.exe built using the pyinstaller --onefile
option to VirusTotal, a service that scans file submissions
with a multitude of AV engines:
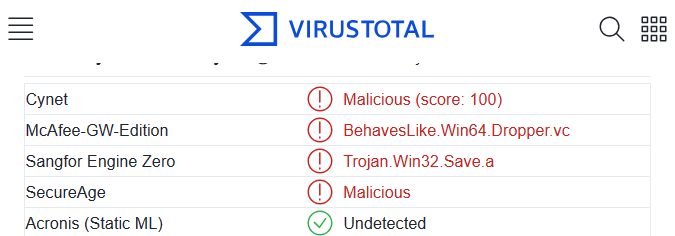
Here, a simple “Hello, World!” application is identified by some AV vendors as malicious. McAfee, which either comes pre-installed with a few common big-name PC manufacturers or installed in enterprise environments, flags the example as malware. It’s not just McAfee, other major vendors like Symantec, Sophos, and Windows Defender have flagged similar executables as malware in the past.
AV false flags can be a problem, not just for PyInstaller executables, but for any exe if the AV’s engine finds enough similarities. To prove that the executable is authentic, built by a trusted developer, and has not been tampered with, it needs to be code-signed. Unfortunately, this comes at a cost!
Trusted Code Signing Certificates
Here is a quick rundown of standard code-signing certificates from popular and trusted root certificate authorities:
| Certificate Authority | Cost (1 yr) |
|---|---|
| Certum | €159 |
| DigiCert | $539 |
| GlobalSign | $289 |
| Sectigo | $429 |
Certum offers a discount for open-source projects at €69 for the first year.
There are two types of signing certificates, standard (priced above) and Extended Validation. EV certificates are not available for individual developers unless they have a registered business, such as an LLC. In addition, they can be nearly twice as expensive. The advantage of an EV cert is when the app is first released, users will not be prompted by Windows SmartScreen, notifying the user to be cautious about the app, and rank higher in trust with AV engines. On that last point, code-signed executables do not guarantee that AV engines will not flag them as malware, as bad actors can also code-sign their executables. That is why it is important to periodically sample at least several AV engines to ensure your app is not flagged.
But you don’t have to go down this road. I will show you how MSIX has options around this, providing alternatives for developers. Jumping ahead, let’s see what VirusTotal comes back with the demo packaged with MSIX:

Much better, now to get started!
Building an MSIX Package
Installing MSIX Tools
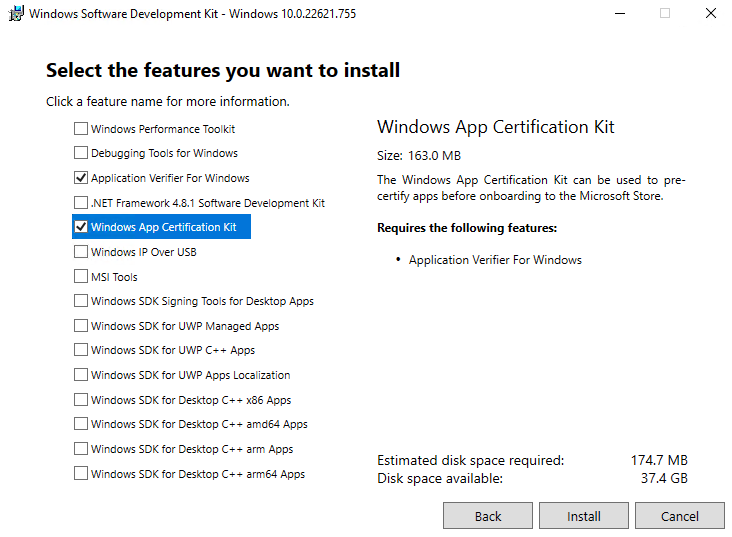
Download the Windows SDK
and select the Windows App Certification Kit (see image below) from the list of
features available to install. This feature provides makeappx and signtool, used
to bundle and sign the application.
Both features, Windows App Certification Kit and Signing Tools for Desktop Applications, provide
signtool, but they are different! Only the App Certification Kitsigntoolsupports signing both MSIX packages and executables. Keep this in mind if you have both installed.
Next, add the tools to the Path Environment variable. Either type in “Edit Environmental Variables” in Windows Search, or paste the following into the Windows Run Command (press the Win + R keys at the same time):
rundll32.exe sysdm.cpl,EditEnvironmentVariables
Double-click the Path Environment variable under User variables, then add a new entry
with the path to the Windows SDK. It is typically under the x86 Program Files directory,
be sure to include the App Certification Kit folder in the path entry.

Launch a new PowerShell console and enter makeappx. It should return the following:
PS> makeappx
Microsoft (R) MakeAppx Tool
Copyright (C) 2013 Microsoft.  All rights reserved.
Create a Code Signing Certificate
To be able to install an MSIX package, it must be code-signed. You may use an existing trusted code-signing certificate if you already have one, or with a PowerShell console running as Administrator, paste the following to create a self-signed certificate for code-signing.. Do not close the PowerShell console just yet after issuing this, as it is needed for the next part.
$cert = New-SelfSignedCertificate `
    -Type Custom `
    -Subject "CN=Python Appx Demo, O=Demo Corp, C=US" `
    -KeyUsage DigitalSignature `
    -FriendlyName "Python Appx Demo Cert" `
    -CertStoreLocation "Cert:\LocalMachine\My" `
    -TextExtension @("2.5.29.37={text}1.3.6.1.5.5.7.3.3", "2.5.29.19={text}")
Since the MSIX installer only trusts certs from the Local Computer Store under Trusted People or Trusted Root Authorities, the self-signed certificate must be moved to that location. It is recommended to use Trusted People to trust the self-signed cert. Issue the following into the same PowerShell console used earlier to move the cert over.
Move-Item -Path $cert.PSPath -Destination Cert:\LocalMachine\TrustedPeople\
Generate the Manifest
It is possible to write the AppxManifest.xml XML file manually,
however, for the sake of keeping this demo simple, I have a repository that
contains a Python script to generate them.
There are a few things to grab before we can generate the manifest. Visit the Python MSIX demo project repo and download the following to the same project directory that you ran the PyInstaller demonstration from the previous section:
manifest.jsongen_msix_xml.py\logosfolder and its contents
Next, using a PowerShell console, navigate to the project directory and type the following:
PS> ./.venv/Scripts/Activate.ps1
(venv) PS> python .\gen_msix_xml.py --app-version 1.0.0.0 --manifest .\manifest.json --logo-dir .\logos .\dist\demo\
Generating MSIX files...
Using Code Signing Certificate:
 'Python Appx Demo Cert': 7CD6EED1AD704AAEB7C5D0ECE94051D50879EB0F

Generated AppxManifest
Generated AppInstaller
Completed Successfully!
Now that the manifest has been generated it is time to test it out.
Testing the Manifest
To add the application directly from the AppxManifest.xml
file, Windows needs to have the Developer Mode option enabled. Go to Settings >
Update & Security > For Developers and enable Developer Mode. For more
information, see the Microsoft Docs on Developer Mode.
If you are using an older version of Windows, you may need to enable Sideloaded Apps as well. For current versions of Windows, this is enabled by default and is not provided as an option under Settings.
With a PowerShell console in the project directory, issue the following:
PS> Add-AppxPackage -Register .\dist\demo\AppxManifest.xml
This will parse the AppxManifest.xml and register the application with
Windows. It validates the XML in reference to the XML schemas. However, there
are a few gotchas to be aware of:
- If the logo images cannot be resolved, the registration will succeed but the icons will be blank.
- Since this process does not sign the application, certificate issues will not be caught here.
With that, check the Start Menu to see if the application is listed.

And then launch it.

Success! Note that since the application was installed using the manifest, it launched from the project directory where PyInstaller placed the executable, as you can see from the path in the title bar.
Pull up the Start Menu again, right-click the application, then select Uninstall. Give it a few seconds, or close the Start Menu and open it again to refresh faster, and it should be gone. Did you notice that it didn’t kick you to Control Panel - Programs and Features to select the app and uninstall it again? This is already a better user experience!
Make an MSIX Package
Now it is time for the real deal. With a PowerShell console in the project directory, issue the following:
PS> makeappx.exe pack /d .\dist\demo\ /p demo.msix
...
Processing "\\?\C:\dev\pyinstaller_and_msix\dist\demo\msix_assets\logo_150x150.png" ...
Processing "\\?\C:\dev\pyinstaller_and_msix\dist\demo\Demo.AppInstaller" ...
Package creation succeeded.
You should have a demo.msix file in the project directory. Launching the file will bring up the MSIX installer, but since the package is not signed, the installer will not allow installation. So let’s sign it.
Sign the MSIX Package
With PowerShell running as Administrator, navigate to the project directory and issue the following:
PS> signtool sign /fd sha256 /v /sm /s TrustedPeople /a /t http://timestamp.digicert.com .\demo.msix
The following certificate was selected:
    Issued to: Python Appx Demo
    Issued by: Python Appx Demo
    Expires:   Thu Aug 01 08:47:14 2024
    SHA1 hash: 7CD6EED1AD704AAEB7C5D0ECE94051D50879EB0F

Done Adding Additional Store
Successfully signed: .\demo.msix

Number of files successfully Signed: 1
Number of warnings: 0
Number of errors: 0
The /t option provides a timestamp server to produce a timestamp for the signature to be valid when the certificate expires.
And with that, the MSIX package is signed. Launch it and install the application.
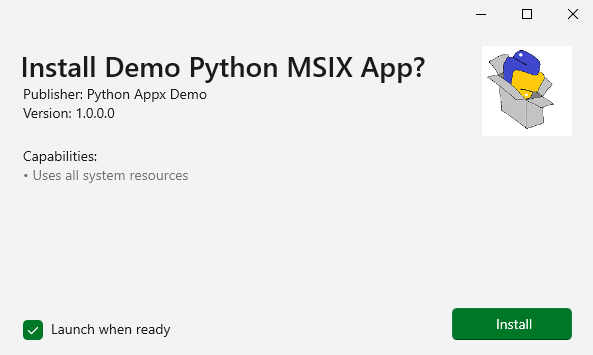
Within a few seconds, the app will install and launch like so:

As you can see from the path in the title bar, the application launched from the WindowsApps folder. In addition, we can see the Package Full Name (PFuN) Python.Demo.MSIX.App_…, the unique identifier for the application.
Distribution
There are two methods to distribute the MSIX package; via the Microsoft Store or an external source. If you use the Microsoft Store, Microsoft will sign the MSIX package and provide an entire ecosystem for you to manage your apps. If you use an external source, you must code-sign the MSIX package. That said, the application can still be automatically updated by using an AppInstaller file.
Microsoft Store
As stated above, Microsoft will sign the submitted MSIX packages for you. You may be wondering what the catch is, Fair enough, here goes:
- Registering a new account as a developer is $19 USD…and that’s it, no annual fee!
- Requires compliance with Microsoft Store Policies and Code of Conduct, some interesting highlights:
- 10.2.1 - Products that browse the web must use the Chromium or Gecko open-source engine.
- 10.13.10 - Products that emulate a game system or platform are not allowed.
- If you intend to charge for your app using the Microsoft Store to handle the transactions, then Microsoft will take a cut of the revenue. See Section 6 of the Microsft Store Developer App Agreement for details.
- Lastly, each app and update for the application is required to go through an approval process.
Packaging for the Store
Publishing to the Microsoft store requires several additional steps, reference this outline on publishing your app. In addition, the MSIX package manifest will need to be updated with the Product Identity information Microsoft provides for the application. It will look something like this on the Microsoft Partner Center site:

Update the AppxManifest.xml file with that information:
<?xml version='1.0' encoding='utf-8'?>
<Package ...>
  <Identity Name="12345<Publisher Name>.PythonMSIXAppDemo" Publisher="CN=<UUID>" ... />
  <Properties>
    <DisplayName>Python MSIX App Demo</DisplayName>
    <PublisherDisplayName><Publisher Name></PublisherDisplayName>
...
And rebuild the MSIX package. Do not code-sign the package, as Microsoft will do that part. Run the package through the Windows App Certification Kit. Once everything looks good, submit the package to Microsoft. If the package checks out it will show up as validated in the Partner Center.

Full-Trust Requirements
The AppManifest uses mediumIL for the required Trust Level, also known as
Full-Trust. In short, this requests the application have access to the system
similar to a traditional desktop application. Microsoft has
additional requirements for this Trust Level for store submissions, such as a
mandatory privacy policy and a written statement justifying it in the
application submission.
Another option, appContainer, is available. This provides a more sand-boxed
environment for the application, using a virtual file system and registry for
specific directories. I have not evaluated this option, but it could be worth
exploring.
External Source
MSIX can be managed from an external source as well. This is done by providing an AppInstaller file, which provides the location of the MSIX package with additional metadata for things like update options. Executing the AppInstaller file provides the same experience as installing the package directly; behind the scenes, the package is downloaded from the source and installed.
Setup a Local Web Server
The following section outlines how to set up a local web server as a source for the demo application, providing a playground for testing different scenarios and options in the AppInstaller file.
Adding Loopback Exemption
The Desktop App Installer application, along with other Windows 10 applications, are restricted from using IP loopback addresses. Add an exception for the MSIX installer by launching PowerShell as Administrator and issuing the following:
PS> CheckNetIsolation.exe LoopbackExempt -a -n="microsoft.desktopappinstaller_8wekyb3d8bbwe"
PS> CheckNetIsolation.exe LoopbackExempt -s
List Loopback Exempted AppContainers

[1] -----------------------------------------------------------------
    Name: microsoft.desktopappinstaller_8wekyb3d8bbwe
Nginx
If you have Docker installed, launch PowerShell in your project directory and issue the following to set up a local web server to host the MSIX package and AppInstaller file:
PS> mkdir msix_site
PS> docker run --rm -v ./msix_site:/usr/share/nginx/html:ro  -p 80:80 nginx
If not, you can download Nginx for Windows, and extract the archive.
Start the server by bringing up a PowerShell console and from the nginx
directory issue:
PS> start nginx
AppInstaller
It is possible to write the AppInstaller XML file manually, however, to keep
things simple, I have added code in the Python script to generate it via the
--gen-installer option.
Using a PowerShell console, navigate to the project directory and type the following:
PS> ./.venv/Scripts/Activate.ps1
(venv) PS> python .\gen_msix_xml.py --app-version 1.0.0.0 --manifest .\manifest.json --gen-installer --logo-dir .\logos .\dist\demo\
Generating MSIX files...
Using Code Signing Certificate:
 'Python Appx Demo Cert': 7CD6EED1AD704AAEB7C5D0ECE94051D50879EB0F

Generated AppxManifest
Generated AppInstaller
Completed Successfully!
Make and sign the MSIX package following these steps. Copy both the MSIX package and AppInstaller file to the web server directory.
PS> cp .\dist\demo\Demo.AppInstaller .\msix_site\
PS> cp .\demo.msix .\msix_site\
If you are not using the Docker method, copy the files to the html directory under where nginx was extracted.
After that, download the AppInstaller file from http://localhost/Demo.AppInstaller and launch it. The MSIX installer will launch, and in the background pull the latest AppInstaller file from the server, download the MSIX, and then run it guiding you through the same installation process as before.
Trust Your Self-Signed Cert
A while back I mentioned that it would be possible to get around purchasing a trusted code-signing certificate. First, let’s see what happens when the a user downloads and runs the AppInstaller file.
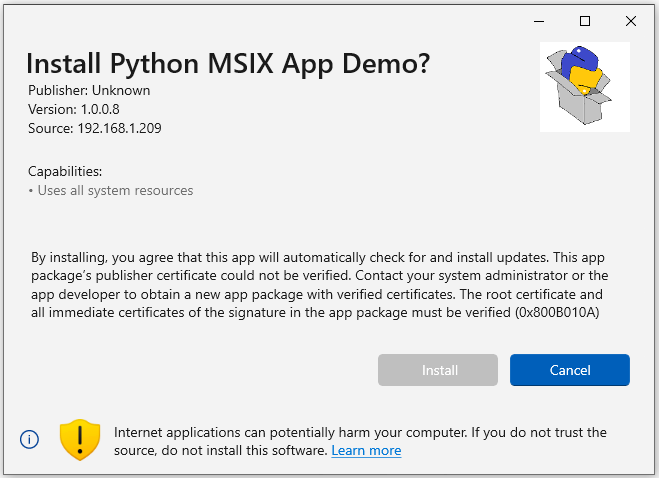
From the screenshot above, the user cannot install the application as the certificate it is signed with is not trusted. In order for the user to trust the application, you will need to export the public key from the self-signed certificate and supply it for the user.
With PowerShell running as Administrator, navigate to the project directory and issue the following:
PS> $cert = Get-ChildItem Cert:\LocalMachine\TrustedPeople | Where-Object {$_.Subject -like "*Python Appx Demo*"}
PS> $cert | Export-Certificate -FilePath demo.cer
Add the file to the web server directory. The user can then download the certificate and double-click it to run the Certificate Import Wizard.
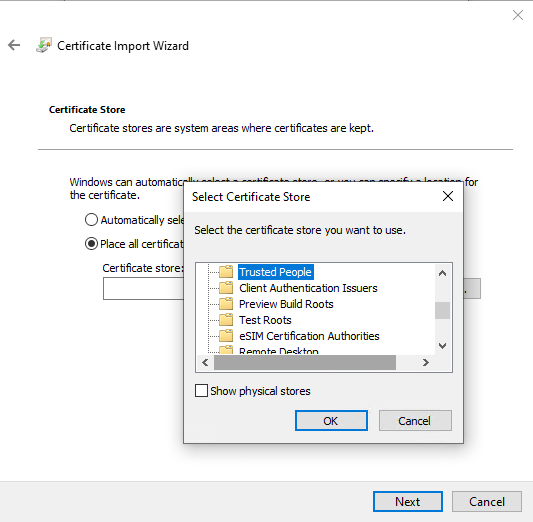
First, select Local Machine as the store location, click Next, then select Place all certificates in the following store and select Trusted People, and finish the process. That is all there is to it; the user can now run the AppInstaller file to install the application.
Performing Updates
Windows can, based on the settings in the AppInstaller file, periodically check the external source AppInstaller file to see if there are updates. It does this by examining both the version of the AppInstaller and the version of the MSIX package listed in the AppInstaller file.
If, for example, HoursBetweenUpdateChecks was to be updated from 0 to 24 hours,
then updating the version of the AppInstaller along with the update setting
will apply the new setting for the client once they either launch the
application (as 0 will trigger an update check when the app is launched) or the
background update task runs. The update settings may also be changed in the AppInstaller file without updating
the AppInstaller version if the MSIX package version is incremented.
The manifest.json file in the project directory contains the update options
for Appinstaller.
"UpdateSettings": {
    "OnLaunch": {
        "HoursBetweenUpdateChecks": 0,
        "ShowPrompt": false,
        "UpdateBlocksActivation": false
    },
    "AutomaticBackgroundTask": true,
    "ForceUpdateFromAnyVersion": false
}
Listed below is a summary of what the update settings do, for more information see the Microsoft Docs on AppInstaller Update Settings.
HoursBetweenUpdateChecks |
Hours to wait before checking for an update. If available, the update runs in the background once the app is launched. |
ShowPrompt |
If HoursBetweenUpdateChecks is expired and an update is available,
a prompt appears at launch about the update.
|
UpdateBlocksActivation |
Similar to ShowPrompt except it blocks user from running the
current version at prompt, only allowing to update.
|
AutomaticBackgroundTask |
Every 8 hours an update check is performed in the background and, if available, the app is updated. |
ForceUpdateFromAnyVersion |
Permits downgrading an app as an update. Otherwise, the app version can only increment to trigger an update. |
Summary
This was a quick overview on how to package a Python application with MSIX. Be sure to check out MSIX resources for more information on MSIX. In addition, please feel free to use the Python MSIX demo project as a starting point to package your own applications.